
Do you get that procrastinated-until-Monday-morning-and-didn’t-do-homework feeling when discussing SharePoint and Office 365 permission levels? If you happen to suffer from that occasional feeling of dread, don’t worry! Most admins don’t fully understand what permission levels are all about either.
However, even if you may be one of a million admins who bluff their way through permission levels on SharePoint and Office 365, there’s no taking the back seat to enforcing a strong collaboration environment. Gear up to learn about the different admin roles and permission levels within SharePoint & Office 365 here!
What are the different admin roles in Office 365?
To get started with our discussion on permission levels, we need to first break down all of the different admin roles in Office 365.
Global Admin
Global admins can not only assign other admins with roles, they can also access all of the administrative features within the Office 365 suite of services in your plan.
Billing Admin
Billing admins have a multifaceted management capacity that allows them to assess service health, make purchases, and manage all organizational subscriptions and support tickets.
Exchange Admin
Exchange admins are central to the organization’s email system. They’re responsible for managing mailboxes and anti-spam policies via the Exchange and Office 365 admin center.
SharePoint Admin
SharePoint admins are responsible for managing content and user activity on SharePoint Online, which is detached from the global admin’s capabilities on Office 365.
Password Admin
Password admins are accountable for all password-related services, including resetting user passwords, managing service requests, and monitoring service health.
Skype for Business Admin
Skype for Business admins not only configure the communications channel for the organization, they also monitor all user activity on Skype for Business.
Compliance Admin
Compliance admins are responsible for a number of security items across the organization, including compliance policies and security reports on Office 365, Exchange Online, and Azure AD.
Service Admin
Service admins are granted “View Only” permissions when opening Microsoft support tickets. They can view support requests through the service dashboard and message center.
User Management Admin
User management admins have the capacity to reset user passwords, add or delete accounts, and monitor overall service health. However, they cannot manipulate other admin accounts.
Dynamics 365 Admin
Dynamics 365 admins are split into online and service categories, in which each role is accountable for security, licenses, user accounts, and tenants in Dynamics 365.
Power BI Admin
Power BI admins are responsible for controlling the organization’s usage of Power BI features, including access and usage metrics.
How do I assign admin roles?
To assign admin roles on Office 365, go to the Office 365 portal (https://portal.office.com), click on the App Launcher icon, and select Admin. From there, you can head to the Active Users tab under the Users section and select the user that you are trying to assign with an admin role. Finally, click on Edit next to the Roles tab and select Customized Administrator to see the list of available roles.
When assigning admin roles, it’s essential not to assign them to users who have not had the relevant training or the capacity to understand the impact of their actions. Considering that admins can both positively and negatively influence their users, it’s crucial for global admins to communicate the weight of their actions.
Understanding SharePoint Online permission levels
When creating a new SharePoint site, the following groups are provisioned, unless otherwise stated to inherit permissions:
- Viewers (View only)
- Visitors (Read)
- Members (Edit)
- Owners (Full control)
Here is a quick overview of the default permission levels and their attributes:
| Permission Level | Attributes |
| Full Control | · All permissions |
| Read | · View items, versions, and pages · Create alerts · Use self-service site creation |
| Contribute | · Read permissions · Add, edit, or delete items · Delete versions · Browse directories · Edit and manage personal user information · Add, remove, or update personal web parts |
| Edit | · Contribute permissions · Manage lists |
| Approve | · Contribute permissions · Override list behaviors · Approve items |
| Design | · Edit permissions · Add and customize pages · Apply themes and borders · Apply style sheets · Override list behaviors · Approve items |
| Limited Access | · View application pages · Browse user information · Use remote interfaces and client integration features |
| Manage Hierarchy | · Design permissions (excluding approve items, apply themes and borders, and apply style sheets) · Manage permissions, alerts, and websites · View web analytics data · Create subsites · Enumerate permission |
| Restricted Read | · View and open items and pages |
| View Only | · View application pages, items, and versions · Use self-service site creation, remote interfaces, and client integration features · Create alerts · Browse user information |
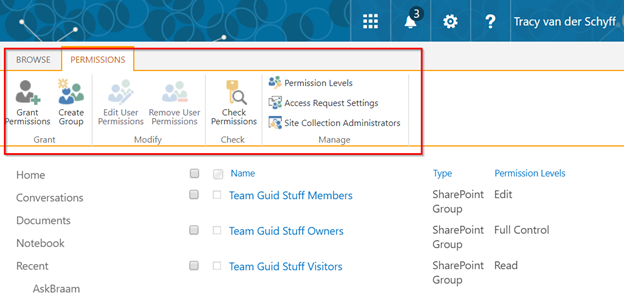
How do I assign permission levels?
To assign permission levels on Office 365, head to the Settings icon at the top right corner of the window and click into the Permissions tab. From there, you can invite users, access Advanced Permission settings, and change user permission levels.
However, when changing permission levels in SharePoint, you must first ensure that you have not navigated up to the parent site. If you are presented with a window stating that you are inheriting permissions, then you will have to break the inheritance before making any changes to your current site.
Understanding permission inheritance
When it comes to permission inheritance, it’s important to understand the scope of your permissions settings, including the hierarchy of your sites.
Given that the top-level site is the root of your site collection, its sub-sites will inherit all of the same permissions, as well as its apps, documents, and items.
Personally, I prefer setting up sites with groups of users from the same department or team. This helps to ensure that all of the apps on the site will inherit the same permissions.
Additionally, keep high-risk content that should not be accessible to everyone within your organization in OneDrive or create a Microsoft Team specifically to house the sensitive information.

How do I break inheritance or re-inherit permissions?
To break inheritance or re-inherit permissions, click on the Settings icon, select Site Permissions, and browse through the Advanced Permission options. From there, you can apply policies to either break inheritance or re-inherit permissions from the parent site.
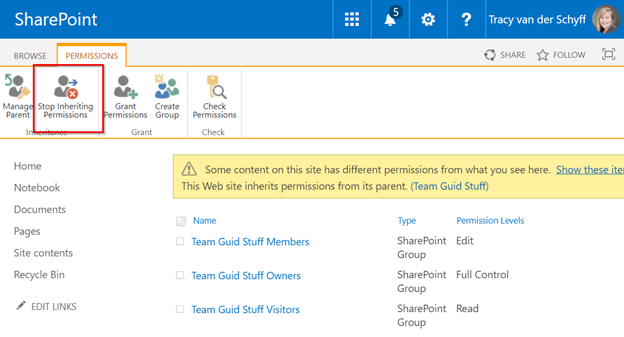
 Fig. 2: Reinherit permissions from parent site.
Here are a few tips to consider when breaking inheritance or re-inheriting permissions:
- The Share button allows users to distribute content with third-party users outside of the department or organization.
- Don’t overcomplicate 80% of your site because 20% of the content is at risk.
- Ensure that your users understand the difference between relevance and risk. Admins don’t have to remove content because it is no longer relevant.
- Note the differences between Edit and Contribute permission levels. Specifically, users with Edit rights can delete apps.
- Creation of Microsoft Teams and Communication sites provision an Office 365 Group for the permissions. These can also be used as distribution lists on Outlook.
How to create and edit office 365 permissions levels
Bear in mind that permission levels can be modified to suit the needs of your users. It’s important for admins not to create too many levels, as this can not only be confusing, but can also make permissions management more challenging than it has to be.
To create or edit permission levels, click on the Settings icon, go into the Site Permissions tab, and select Permissions Levels under the Advanced Permission Settings option. From here, you can have the option to add or modify permission levels.
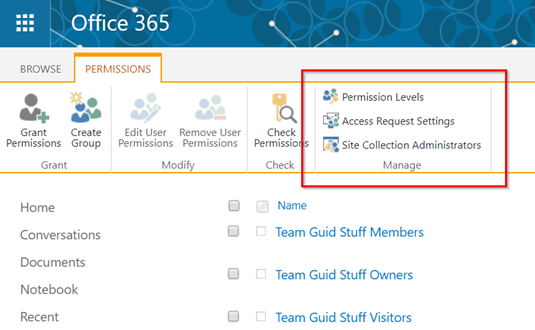 Fig. 3: Create permission levels.
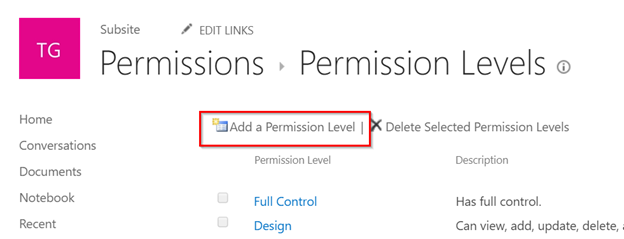 Fig. 4: Add a permission level.
Conclusion
If you’re looking to customize, add, or delete permission levels on SharePoint and Office 365, you have to acknowledge how incorrect permissions can quickly upset a lot of users. From an administrator perspective, the right permissions will mean that most users will not be aware that they exist at all. In fact, managing permissions often entail doing the job without raising any awareness.
Regardless if your SharePoint or Office 365 environment does not rely heavily on permission levels, procrastinating on your homework and coming into work without understanding permissions can negatively impact your organization’s infrastructure and security in the long run. Remember: there’s never a good reason to compromise a strong collaboration environment!
By applying the foundational knowledge laid out in this post, you can implement a comprehensive permissions strategy on SharePoint and Office 365!